如何使用C開發Verilog System Task/Function? (SOC) (Verilog) (Verilog PLI)
Abstract
本文介紹使用C開發Verilog System task/function,以彌補Verilog功能的不足。
Introduction
使用環境 : Cadense NC-Verilog 5.4 + Visual C++ 6.0
Verilog PLI(Programming Language Interface)是Verilog所提供的機制,我們可以使用C語言開發自己的system task/function,以彌補在Verilog撰寫testbench的不足。
在此文件,將學習到:
1.如何在Verilog呼叫C function?
2.如何撰寫簡單的calltf routine與register function?
3.如何在Windows平台使用Cadence NC-Verilog編譯與連結?
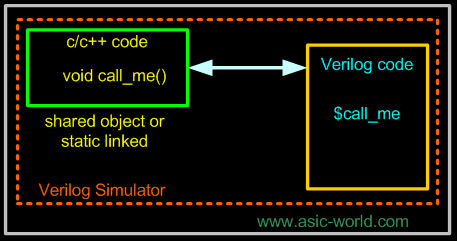
如下圖所示,當simulator執行自己開發的system task時,會轉而執行C的function,執行完再回到Verilog。
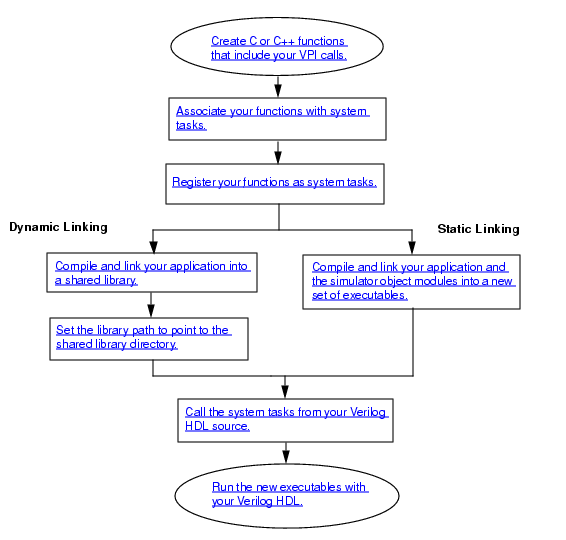
使用C開發Verilog system task的流程如下圖所示:
Step 1:
建立C function
Step 2:
建立C function與Verilog system task的連結資料
hello_world.c / C
2 #include "vpi_user.h" // required by VPI application
3
4 // my own C function for Verilog
5 PLI_INT32 hello_world(PLI_BYTE8 *user_data) {
6 vpi_printf("Hello World from C!!\n");
7
8 return 0;
9 }
10
11 // defined in vpi_user.h
12 /*
13 typedef struct t_vpi_systf_data {
14 PLI_INT32 type; // vpiSysTask, vpiSysFunc
15 PLI_INT32 sysfunctype; // vpiSysTask, vpi[Int,Real,Time,Sized, SizedSigned]Func
16 PLI_BYTE8 *tfname; // first character must be `$'
17 PLI_INT32 (*calltf)(PLI_BYTE8 *);
18 PLI_INT32 (*compiletf)(PLI_BYTE8 *);
19 PLI_INT32 (*sizetf)(PLI_BYTE8 *); // for sized function callbacks only
20 PLI_BYTE8 *user_data;
21 } s_vpi_systf_data, *p_vpi_systf_data;
22 */
23
24 // associating C function with new verilog system task
25 // you can use your favorite function name
26 void register_my_systfs() {
27 s_vpi_systf_data tf_data; // defined in vpi_user.h
28
29 tf_data.type = vpiSysTask; // system task
30 tf_data.tfname = "$hello_world"; // name of system task
31 tf_data.calltf = hello_world; // C function name
32 tf_data.compiletf = NULL; // no compiletf routine
33
34 vpi_register_systf(&tf_data); // register system task to verilog
35 }
第2行
寫PLI一定要include。
第4行
PLI_INT32 hello_world(PLI_BYTE8 *user_data) {
vpi_printf("Hello World from C!!\n");
return 0;
}
自己的C function,僅簡單的顯示Hello World。由於struct s_vpi_systf_data規定自訂的C function的signature必須為PLI_INT32 (*calltf)(PLI_BYTE8 *),所以依照其規定宣告hello_world型別。
24行
// you can use your favorite function name
void register_my_systfs() {
s_vpi_systf_data tf_data; // defined in vpi_user.h
tf_data.type = vpiSysTask; // system task
tf_data.tfname = "$hello_world"; // name of system task
tf_data.calltf = hello_world; // C function name
tf_data.compiletf = NULL; // no compiletf routine
vpi_register_systf(&tf_data); // register system task to verilog
}
建立C function與Verilog system task的連結資料,s_vpi_systf_data定義在vpi_user.h,其完整定義如下:
PLI_INT32 type; // vpiSysTask, vpiSysFunc
PLI_INT32 sysfunctype; // vpiSysTask, vpi[Int,Real,Time,Sized, SizedSigned]Func
PLI_BYTE8 *tfname; // first character must be `$'
PLI_INT32 (*calltf)(PLI_BYTE8 *);
PLI_INT32 (*compiletf)(PLI_BYTE8 *);
PLI_INT32 (*sizetf)(PLI_BYTE8 *); // for sized function callbacks only
PLI_BYTE8 *user_data;
} s_vpi_systf_data, *p_vpi_systf_data;
register_my_systfs() function主要的目的在於將s_vpi_systf_data struct填滿, 名稱不一定要取register_my_systfs,可以自行命名。
29行
定義為System Task。
30行
定義Verilog system task名稱
31行
指定自己寫的C function名稱,為function pointer,為了callback使用。
32行
由於沒用到compiletf,所以設定為NULL。
34行
註冊新的system task。
Step 3:
在simulator註冊新Verilog system task
複製C:\Program Files\Cadence Design Systems\IUS\tools\src\vpi_user.c到目前目錄,將vpi_user.c修改如下:
2 * |-----------------------------------------------------------------------|
3 * | |
4 * | Copyright Cadence Design Systems, Inc. 1985, 1988. |
5 * | All Rights Reserved. Licensed Software. |
6 * | |
7 * | |
8 * | THIS IS UNPUBLISHED PROPRIETARY SOURCE CODE OF CADENCE DESIGN SYSTEMS |
9 * | The copyright notice above does not evidence any actual or intended |
10 * | publication of such source code. |
11 * | |
12 * |-----------------------------------------------------------------------|
13 */
14
15 /*
16 * |-------------------------------------------------------------|
17 * | |
18 * | PROPRIETARY INFORMATION, PROPERTY OF CADENCE DESIGN SYSTEMS |
19 * | |
20 * |-------------------------------------------------------------|
21 */
22
23 #include <stdarg.h>
24 #include "vpi_user.h"
25 #include "vpi_user_cds.h"
26
27
28 /* extern void setup_test_callbacks();*/
29
30 /* ----------------------------------------------------------------
31 The following is an example of what should be included in this file:
32
33 extern void setup_my_callbacks(); <-- Add a declaration for your routine.
34
35 void (*vlog_startup_routines[])() =
36 {
37 $*** add user entries here ***$
38
39 setup_my_callbacks, <-- Add your routine to the table.
40
41 0 $*** final entry must be 0 ***$
42
43 };
44 ------------------------------------------------------------------ */
45
46 extern void register_my_systfs();
47
48 void (*vlog_startup_routines[VPI_MAXARRAY])() =
49 {
50 register_my_systfs,
51 0 /*** final entry must be 0 ***/
52 };
46行
使用extern宣告在hello_world.c的register_my_systfs。
48行
{
register_my_systfs,
0 /*** final entry must be 0 ***/
};
設定simulator啟動時,載入PLI的array,注意最後一個element必須為0。
Step 4:
使用PLI Wizard產生Dynamic Link Library (libvpi.dll)
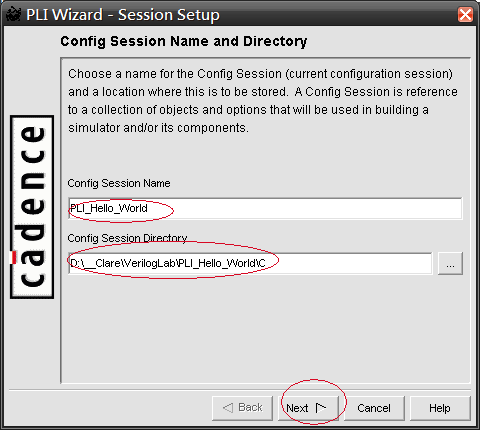
啟動PLI Wizard
開始->程式集->Cadence Design Systems->Design & Verification->PLI Wizard
File -> New Session
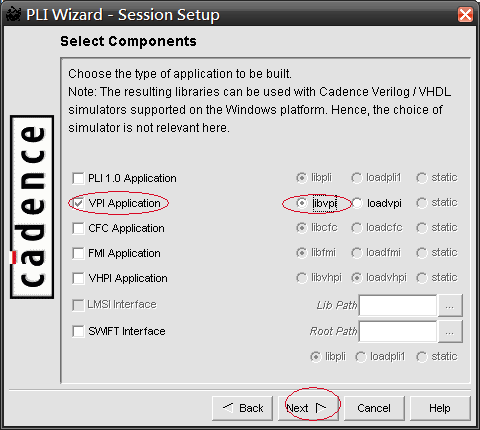
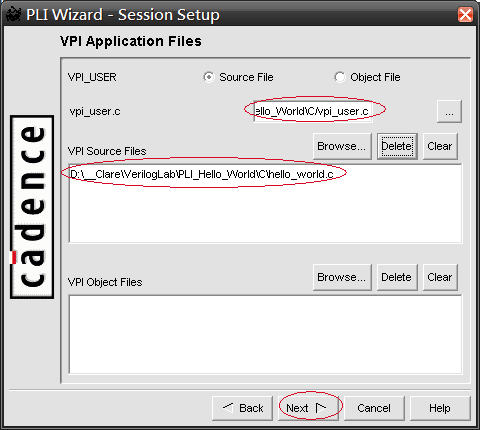
選擇VPI Application與libvp
加入hello_world.c,vpi_user.c會自動抓進來
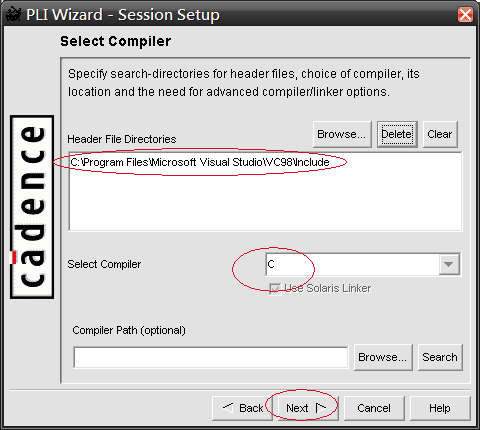
加入VC6的include path: C:\Program Files\Microsoft Visual Studio\VC98\Include
選擇C語言
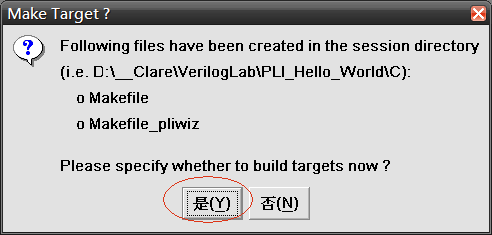
按Finish完成

選(Y)
按Close離開
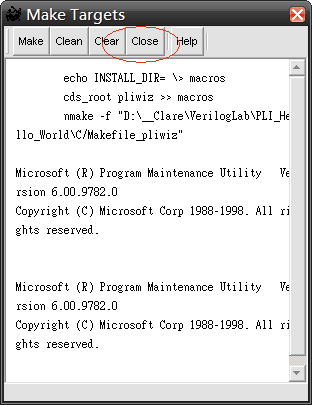
File -> Exit離開PLI Wizard
Step 5:
設定libvpi.dll路徑
在Path環境變數加上libvpi.dll的路徑,注意必須加在C:\Program Files\Cadence Design Systems\IUS\tools\bin;C:\Program Files\Cadence Design Systems\IUS\tools\lib;C:\Novas\Debussy\bin;之前,否則PLI Wizard啟動會有問題。
設定好後須登出在登入,path才會生效。
若只是為了測試,可將libvpi.dll放在與*.v同目錄下即可。
Step 6:
在Verilog使用新的system task
hello_world.v / Verilog
2
3 initial begin
4 $hello_world;
5 #10 $finish;
6 end
7
8 endmodule
Step 7:
執行NC-Verilog
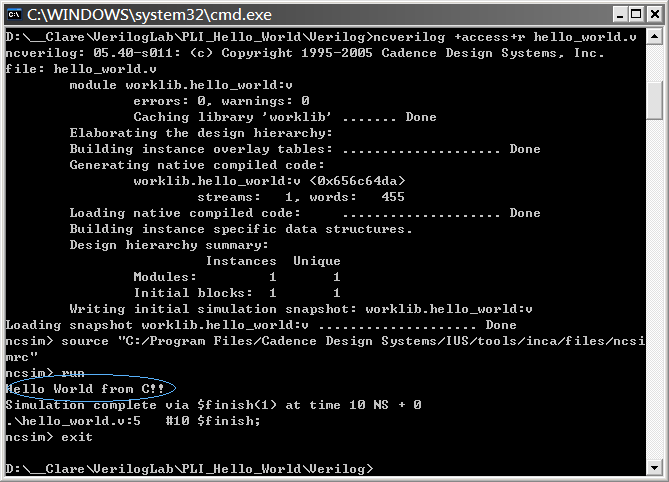
完整程式碼下載
pli_hello_world.7z
Conclusion
PLI在Verilog的IEEE標準中有明確定義,但如何compiling與linking方面,就與simulator與OS有關,IEEE標準並沒有加以定義。本文雖然只是一個小小的Hello World,已經展示了Verilog PLI如何在Windows平台與Cadence NC-Verilog compiling與linking,並看到Verilog如何呼叫一個C的function。
沒有留言:
張貼留言